1. Component list
- Arduino Uno
- Arduino Ethernet shield
- RDM6300 RFID module
- 16x2 LCD display
- RGB LED x 1
- Jumper wires
2. Overall idea
We already have discussed how to design a user access control system using Arduino and GadgetKeeper on this tutorial. However in this tutorial again we discuss about how to design a user access control system (with LCD display) which is little different than the other one in operational level. The display shows the relevant user name when you punch the RFID card if the user validation is successful. Else it shows "Unknown" on LCD and turn ON the red LED connected to Arduino. User validation is fully handled at the GadgetKeeper server side in real time.(once you punch the card to the unit, it reads the tag ID and send it to the GadgetKeeper. Then compare the tag ID with the user list at GadgetKeeper and return the user name if matched). Because of that reason Arduino only need less processing power and Uno is a better choice. User and tag list is not downloaded to Arduino in this design, hence the unit must be connected to the internet to do the tag validation process.
3. Prepare GadgetKeeper
User and tag data are stored in GadgetKeeper. Then we use a method called "getUserByTag" to compare the tag id in the list and fetch the relevant user name. Simply we call this method from Arduino through the internet by passing the tag ID. Thenand fetch the matching user name from it. Lets configure the GadgetKeeper for this test now.
- Create the thing called "RFID"

- Then create the Data Type called "RfidUser" as shown below. Two fields should be added as "name" and "tag". The data type should be string.

- Now create a property "_users" . Please follow the steps shown below carefully.

-
Now click on "Save" button and click on "Edit Value" button. Then add your tags and users as shown below (JSON format),

- Then create a method "getUserByTag" and add the given script below.

-
Then click on "Edit Script" button and add the following action script to it.

- If you want to check the "getUserByTag" method, you can try it as shown below.

4. Prepare the hardware
We use 16x2 LCD display for this project. You can use 1K variable resister if you want to change the back light intensity (pin 15 and 16 of the LCD can be used to supply the power for the back light). Please have a look on this link for more details about LCD. Follow the circuit diagram shown below for this test.
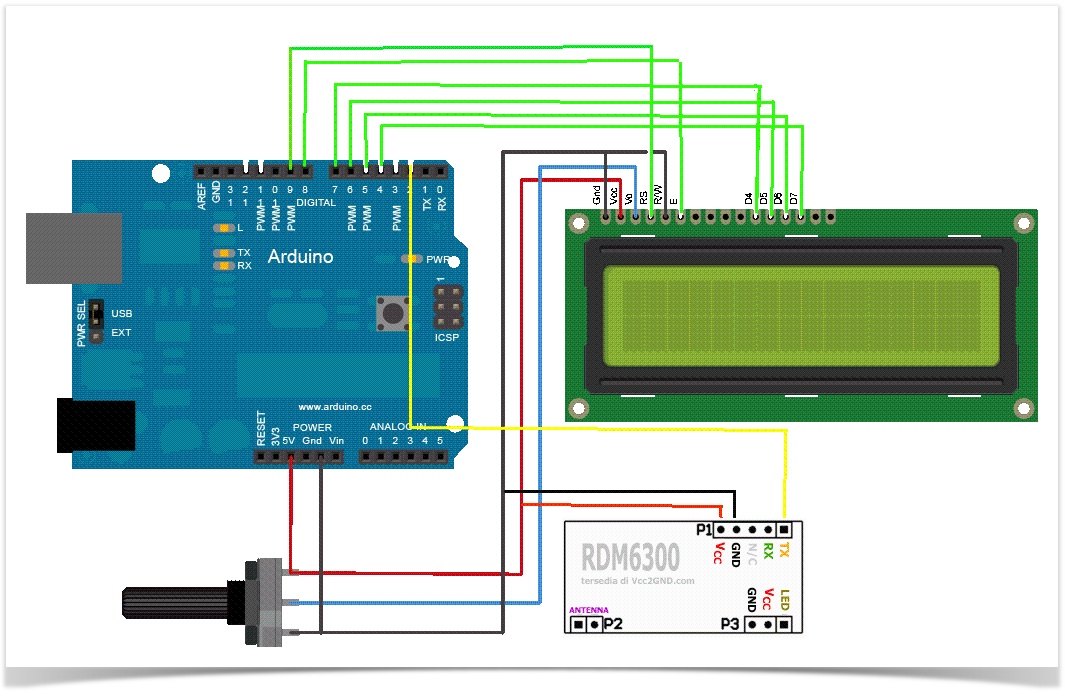

You can connect Green and Red LED to Arduino A0 and A1 respectively for this test. Else you can connect a relay shield to A0 pin on Arduino to control the power supply of your door lock.
5. Arduino sketch
You only need to change the REST API settings according to your settings. Other than that you no need to do any modification on the sketch to test this project. Please make sure to download and install all the relevant Arduino libraries before compiling the code. Also note that we have saved some LCD messages in EEPROM area to save some Arduino program memory.
6. Testing
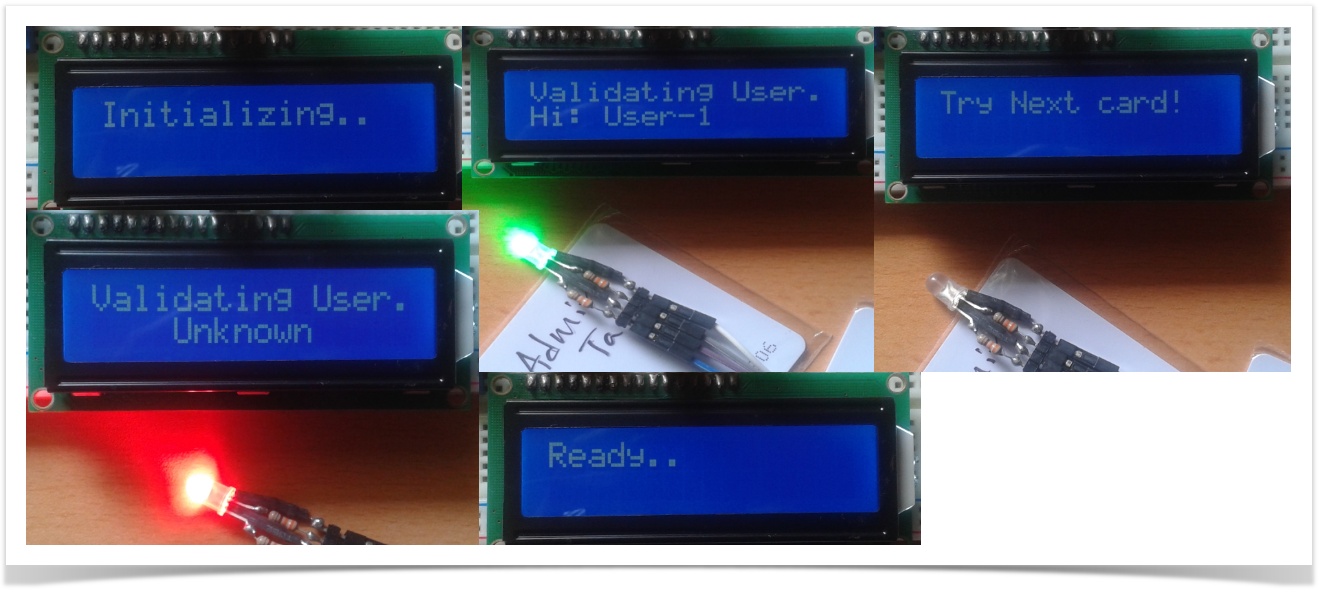
Correctly connect all the hardware and upload the sketch to Arduino. Make sure to change API settings as necessary. Then connect the Ethernet cable to the router/switch. The LCD will show "initializing" on it until connecting to the network and obtain a valid IP using DHCP service (The red LED will turn ON while this time and goes OFF, once the IP address is properly assigned to the unit). Then it will display "Ready" message on LCD. Now the system is ready to validate your RFID cards. Make sure to insert all tag IDs in GadgetKeeper with relevant user names before testing. Also you can monitor the Arduino back end operations using the serial terminal output.

7. In action
have a look on some sample snap images of the system in action.
8. Todo
- You can connect a buzzer with arduino to play a tone, when authenticating a user
- Check the internet connectivity periodically and display "Network error or offline" like message on LCD, if the network connection has some problem.